Plugin Interface
The WooCommerce Zapier user interface is completely redesigned in version 2.
If you are upgrading from version 1, please go to the Plugin Interface Changes chapter to see what’s changed and the Migrating Legacy Feeds chapter for instructions on how to migrate your existing Feeds and Zaps to the new method.
The information below describes the screens and interfaces that you see in your WooCommerce/WordPress dashboard.
Task History
You can find the Task history in your WordPress Dashboard → Side Menu → WooCommerce → Zapier screen → Task History tab.
This is the main place to see every incoming and outgoing task/request for WooCommerce Zapier.
This includes any time that your WooCommerce store’s data is sent to one of your Zapier Zaps or any time that Zapier creates or updates data in your WooCommerce store via one of your Zaps.
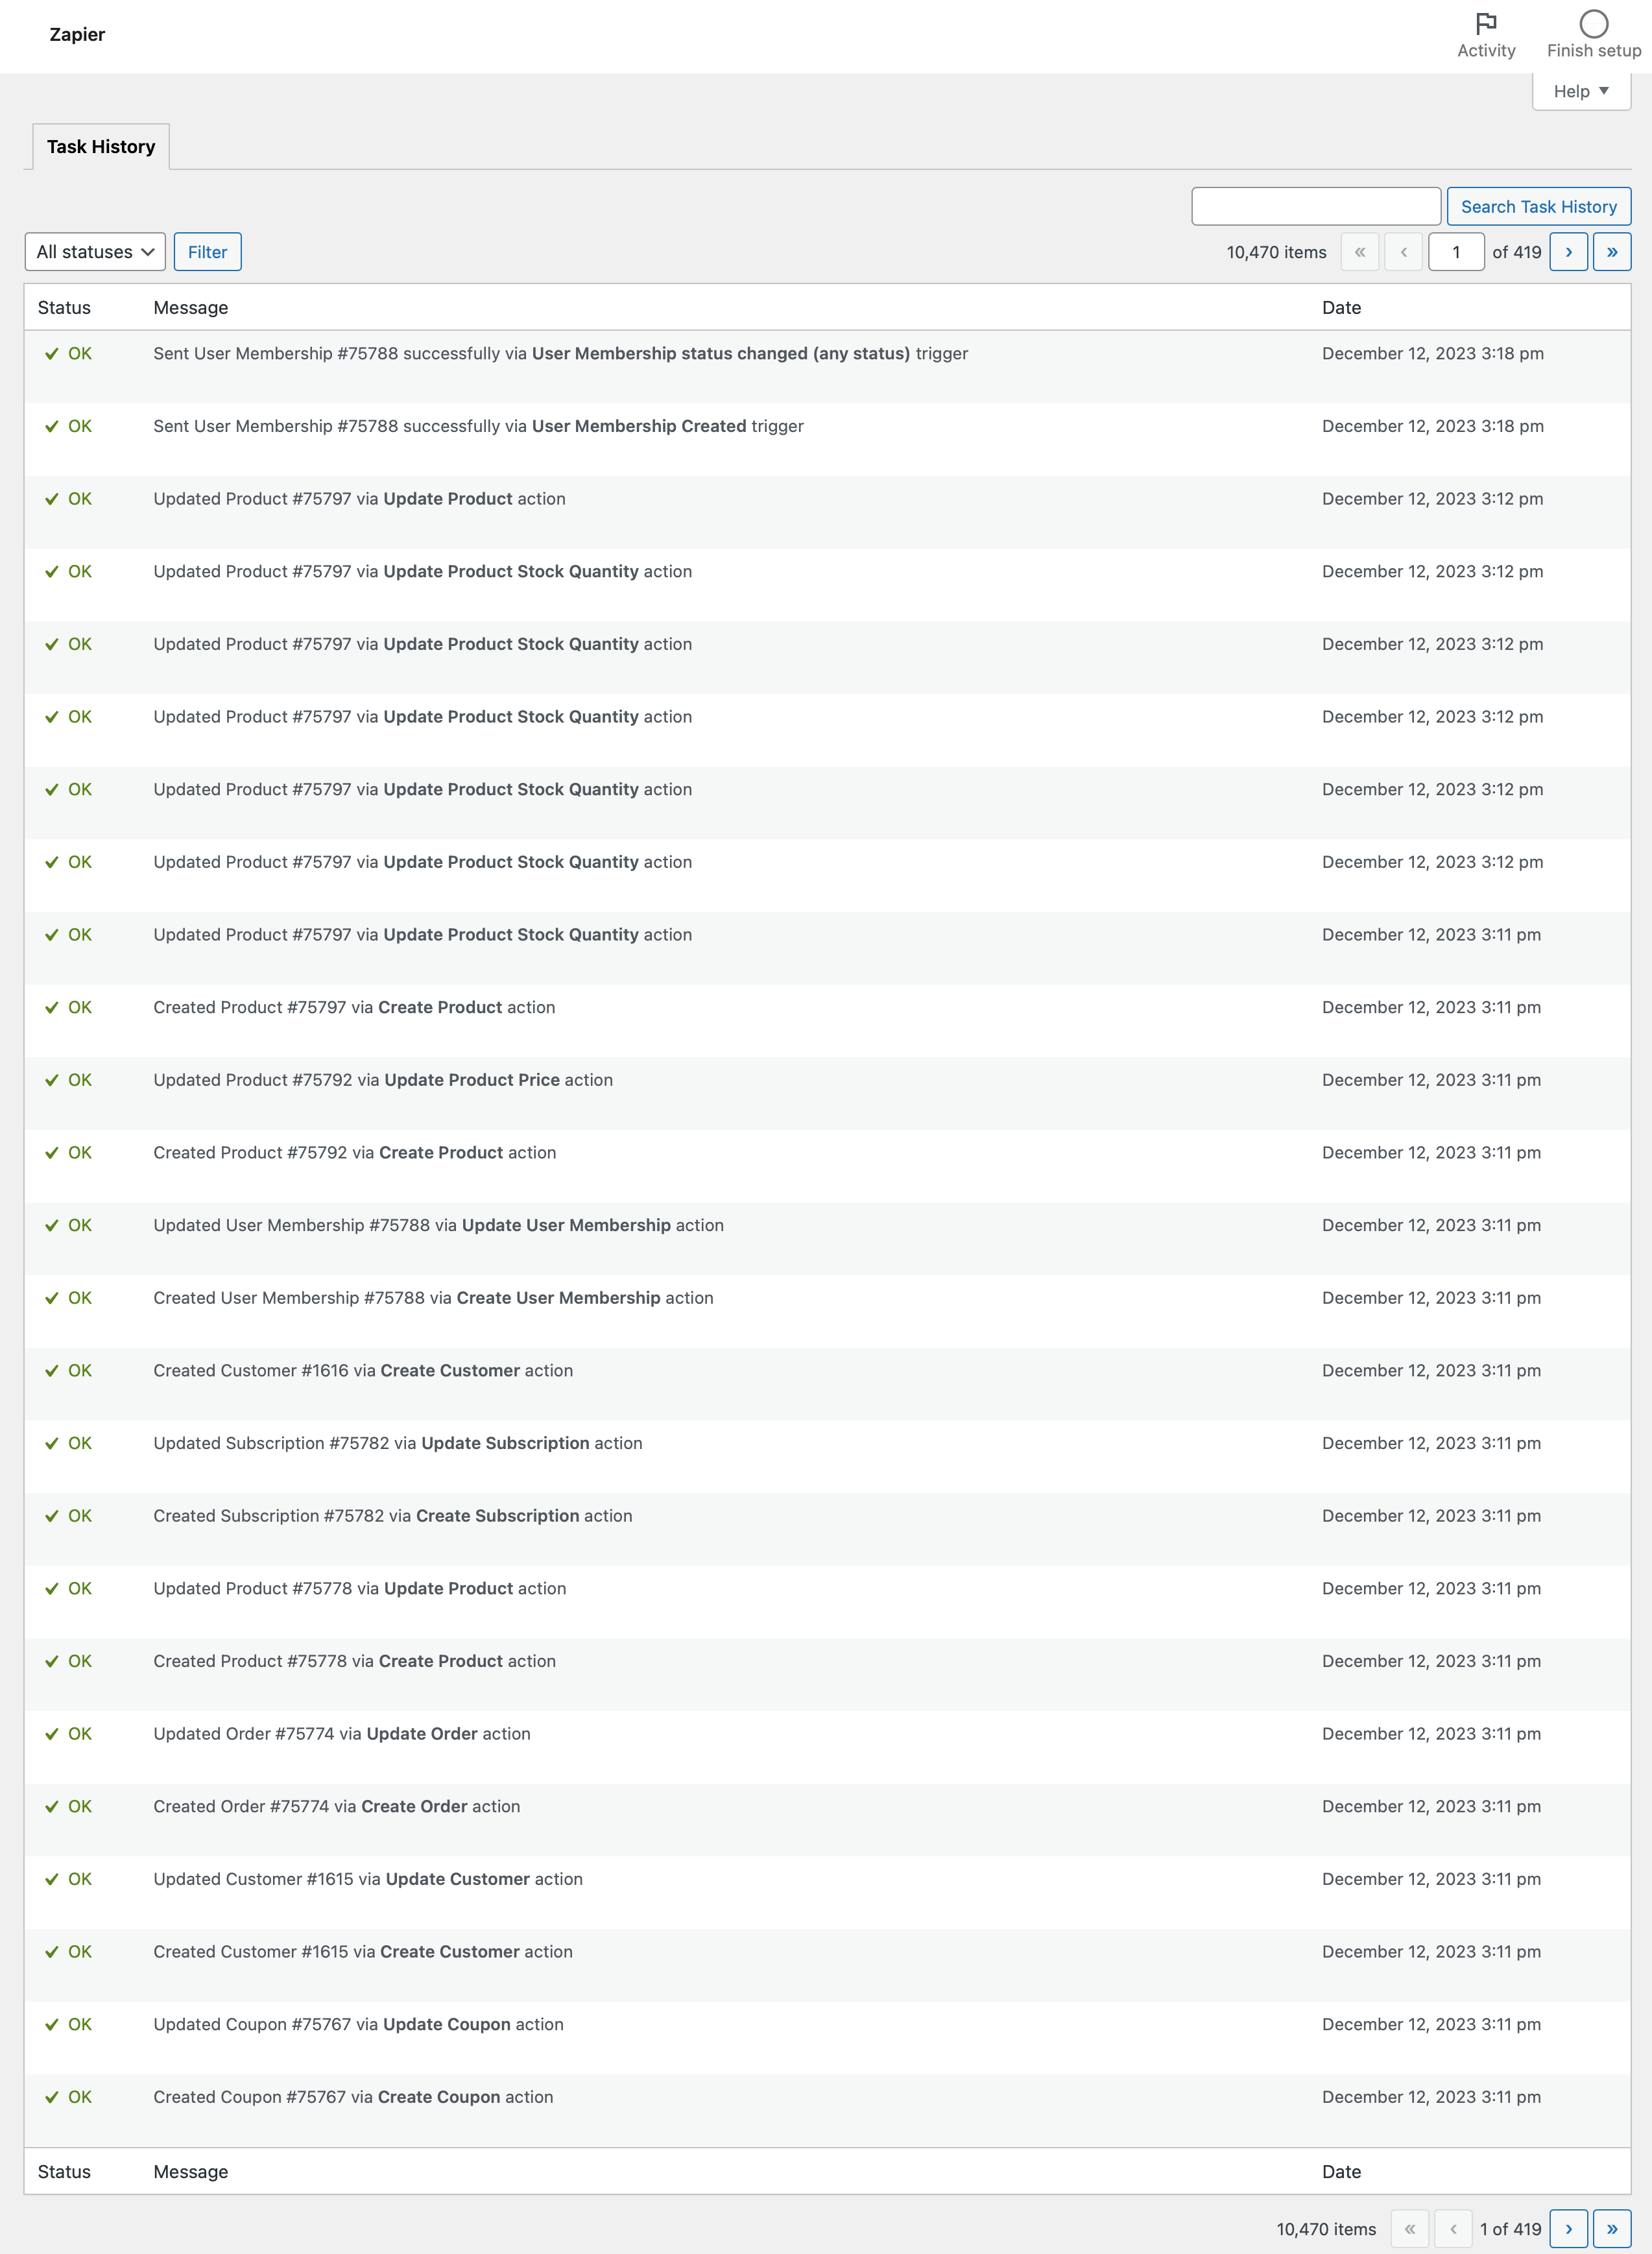
The Task History screen also supports filtering by status and/or searching task history records. You can filter by status (Successful or Errored), or search Task Messages and Error Codes.
WooCommerce Zapier Plugin Version 2.10 Required
Please ensure you update the WooCommerce Zapier plugin to version 2.10.0 to use this functionality.
Task Errors
If you see any tasks with an Error status, please consult the Error Codes chapter for further guidance.

Resource History
Every supported Resource screen (except for Customer) has a WooCommerce Zapier History metabox, located at the bottom of the screen when viewing/editing the Resource.
For example, when you are editing an item, you can see the Task History for that particular item.

You can disable (hide) this metabox by clicking the Screen Options button on the top right corner and deselecting the WooCommerce Zapier History under the Boxes section and then applying (saving) the screen options.
Note
There is no dedicated “Customer” screen in WooCommerce. WooCommerce stores customers in the WordPress User screen.
Legacy Feeds
Available only if you have upgraded to version 2 from the previous 1.x version
Location: WordPress Dashboard → Side Menu → WooCommerce → Zapier screen → Legacy Feeds tab.
If you have upgraded from the 1.x version, and you haven’t yet migrated your Zaps, you can see all existing Legacy Zapier Feeds. There is no option in version 2 to create a new Zapier Feed, but you can still edit and/or delete your existing one if you need to.

Legacy Feeds and Zaps must be migrated by 30 April 2022
All Legacy Feeds and Zaps must be migrated to the new WooCommerce Zapier app before 30 April 2022 (2 years after version 2 was released).
Any Zaps using the WooCommerce (Legacy) app after this date are no longer supported.
Please refer to the Migration Guide for details on how to migrate these legacy Zaps.
Note
When you delete your last Legacy Feed and empty the trash, the Legacy Feeds tab will disappear from WooCommerce and will no longer be accessible.
Status Screen
You can keep track of the overall status of the Zapier integration by going to the WordPress Dashboard → Side Menu → WooCommerce → Status screen and then scrolling to the WooCommerce Zapier section towards the bottom of the screen. You can see a detailed explanation of each row if you hover over the icon with your pointer.
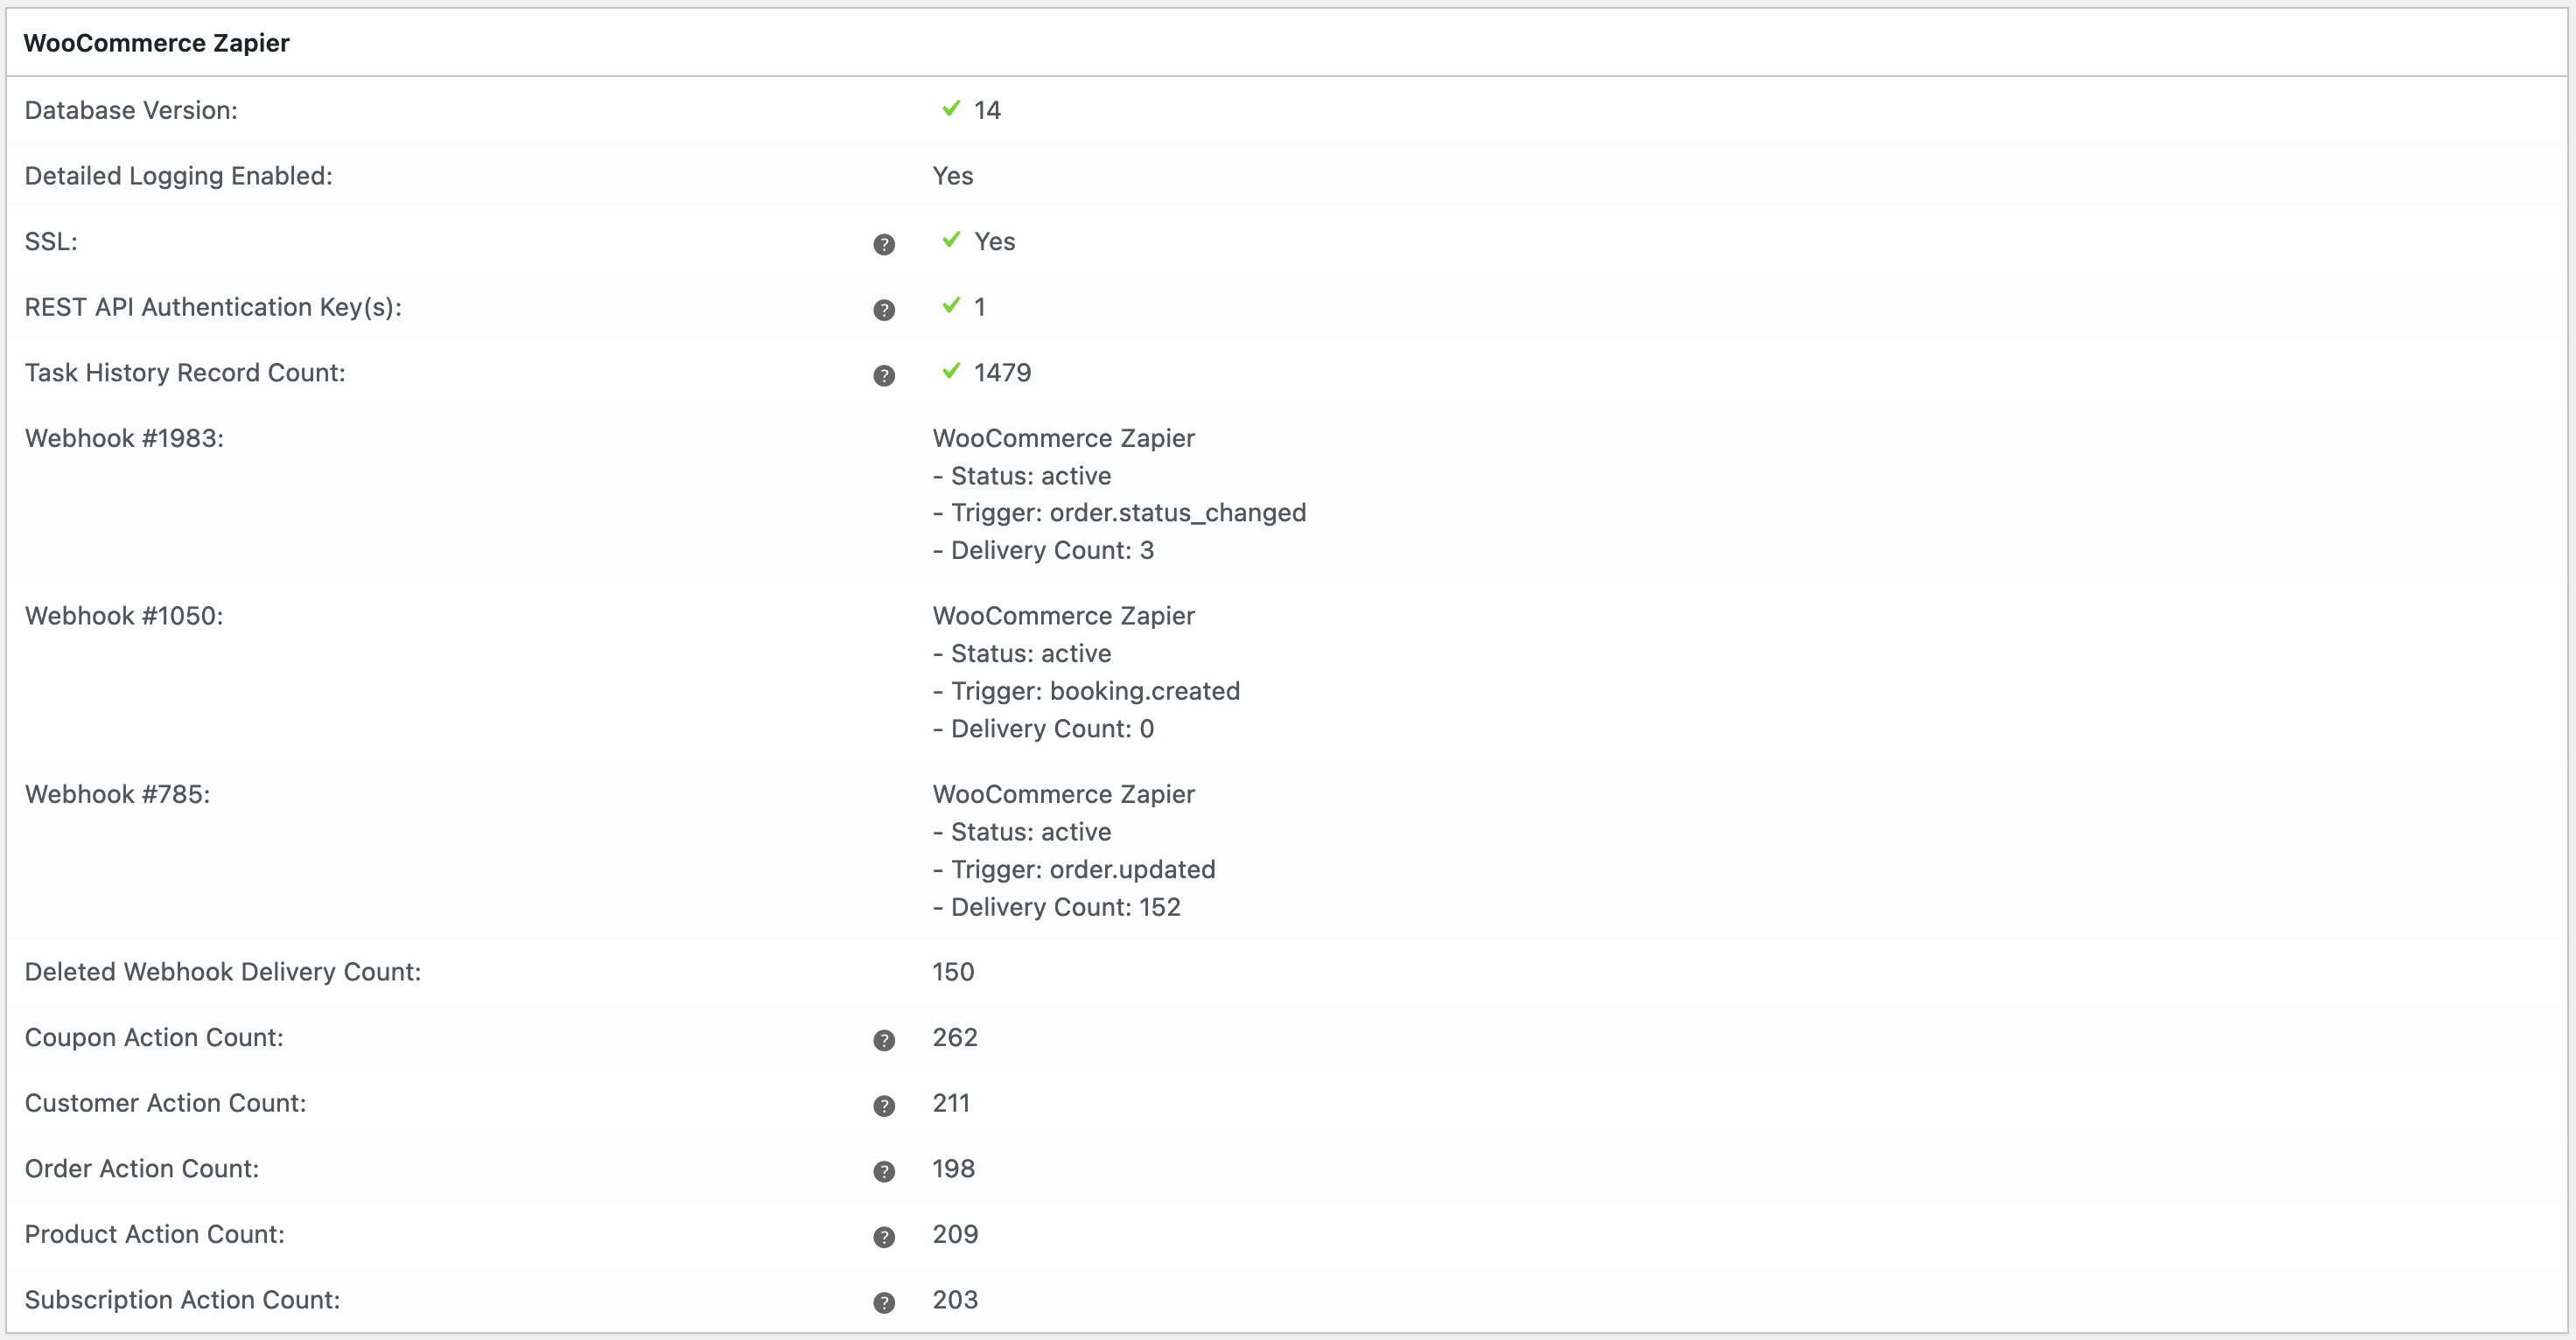
This information is also used by WooCommerce Zapier Support when you contact us.
Troubleshooting
This is the perfect place to start investigating if you encounter any errors in the plugin. For further reference, please see the Troubleshooting Tips chapter.
Logs
To see the Zapier integration logs, go to your WordPress Dashboard → Side Menu → WooCommerce → Status screen → Logs tab and select the newest log whose name starts with woocommerce-zapier. To view the log, you need to press the View button.
This plugin uses WooCommerce’s facilities for logging. For more information on that, please see the Understanding the WooCommerce System Status Report documentation.
The WooCommerce Extension, by default, only logs significant errors that occurred within the plugin. You can enable detailed logging in the Settings Screen.
Note
The log file may be not exist if the plugin recently installed, or there are no recent errors/logs.
Plugin Settings
Location: WordPress Dashboard → Side Menu → WooCommerce → Settings screen → Zapier tab.
Currently, the only setting available for the WooCommerce Zapier plugin is to enable or disable the detailed logging.
If you are experiencing a problem with your integration (or technical support asks you to), you can turn on detailed logging with the Enable Detailed Logging checkbox.
See the Logs chapter on how to access and view the Zapier Integration logs.
Application Passwords
To create a WooCommerce Zapier-specific password, go to the WordPress Dashboard → Side Menu → Users → Profile screen. Scroll to the Application Passwords section, which is halfway down the screen. It looks like this:

Enter a name into the New Application Password Name input (for example WooCommerce Zapier) and press the Add New Application Password button.
WordPress generates a randomly chosen application password. Make sure that you save it in a safe location, as WordPress will not display it again.
Once you have created one, the screen should look like this:

You can generate a new one or delete it later independently from your usual WordPress user account password.
You will use this new Application Password when Authenticating WooCommerce Zapier.
Can’t see the Application Passwords settings in WordPress?
- Ensure you are using WordPress version 5.6 or later.
- If you are using any other security plugins, review their settings to ensure they haven’t disabled the Application Passwords feature.
- If you are using the Wordfence Security plugin, ensure application passwords aren’t disabled.
- If you are still unable to create an Application Password, you can use your regular WordPress password.
Changing or Deleting Passwords
If you delete an application password that you are actively using, your Zapier Integration will stop working.
You will need to provide a valid, active password in Zapier.com, either an Application Password or a WordPress account password.
Other WooCommerce Screens
The following lists consist of various WooCommerce screens, which expose different parts of the inner workings of the WooCommerce Zapier plugin to the admin interface.
The WooCommerce Zapier extension depends on multiple WooCommerce core functionality, including REST API and Action Scheduler.
WooCommerce allows site administrators to inspect and/or modify these, however, in normal use, there should be no need for you to do so because it is managed automatically for you.
Attention
The following information is for reference only. Please be aware, that modifying the WooCommerce Extension behaviour manually is unsupported, and may break the Zapier Integration functionality.
REST API
- WordPress Dashboard → Side Menu → WooCommerce → Settings screen → Advanced tab → REST API
- Lists the REST API Keys that allow other applications to authenticate with WooCommerce. You can find the Zapier integration authentication keys here, along with the other manually or automatically generated ones.
- WooCommerce Zapier keys always start with
Zapier - API Read/Writetext, followed by the creation date. Upon removing a connection in Zapier’s My Apps page, the REST API keys are automatically removed (revoked) from this list as well. -
The number of used WooCommerce Zapier REST API authentication keys is also displayed on the Status Screen.
Note
The creation dates on the REST API keys screen and the My Apps page may be different. For example, the plugin automatically monitors and revokes duplicated keys for a user if the key is not used for 30 days.
Webhooks
- WordPress Dashboard → Side Menu → WooCommerce → Settings screen → Advanced tab → Webhooks
- For each outgoing connection (Trigger), the plugin creates a webhook in WooCommerce.
- These webhooks have the name of
WooCommerce Zapier. Webhooks are created automatically when you turn “ON” a Zap, and they are deleted when you turn “OFF” a Zap in the Zapier.com interface. -
In normal usage, you should have one active WooCommerce Zapier webhook for each active Zap that has WooCommerce as a trigger.
Danger
Removing an active webhook stops sending data to Zapier.
Please see the Webhook Missing or Disabled chapter in troubleshooting how to fix it.Info
When a Zap is disabled, either because of a problem occurring or manually, the corresponding WooCommerce webhook will be removed. Upon turning the Zap “ON” again, the corresponding webhook will be created again.
Action Scheduler
- WordPress Dashboard → Side Menu → WooCommerce → Status screen → Scheduled Actions tab
-
There are two different types of scheduled actions in the WooCommerce Zapier plugin: sending data via webhooks and utility tasks.
- The webhook-related tasks have a Hook name of
woocommerce_deliver_webhook_asyncand the argument has a relatedwebhook_id. If you notice Pendingwoocommerce_deliver_webhook_asynctasks, this means that data is queued to be sent to Zapier, but hasn’t been sent yet. You can safely click the Run link on each of these to force the data to be sent immediately. - Utility tasks are the
wc_zapier_history_cleanupand thewc_zapier_key_cleanup. Both should be in the Pending section all the time, and these should be left as-is. In the Complete section, you can see the previously completed actions.
- The webhook-related tasks have a Hook name of